Page 26 - GarlockFluidSealing2010
SEO Version


A-24
Pump Packing
1. Remove all the old packing with packing hooks, be-
ing careful not to damage the shaft or sleeve. This
means all rings, even the lantern ring and the rings
below the lantern. Clean the stuffng box and exam-
ine the shaft and sleeve. Replace any worn parts
that are scored or deeply grooved.
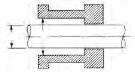
2. Measure and record shaft diameter, stuffng box
bore and box depth. To determine the correct pack-
ing size, measure the diameter of the shaft and the
stuffng box bore. Subtract the shaft diameter from
the bore diameter and divide the difference by two.
This is the required cross-sectional size.
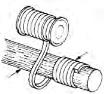
3. Always cut the packing into individual rings. Never
wind the packing into a coil in the stuffng box. Rings
should be cut with a butt joint. Cut rings by using a
mandrel with the same diameter as the shaft in the
stuffng box area. If there is no wear, rings can be
cut on the shaft outside the stuffng box.
Hold the packing tightly on the mandrel, but do not
stretch excessively. Cut the ring and insert it into the
stuffng box, making certain that it fts the packing
space properly. Each additional ring can be cut in
the same manner.
4. Install one ring at a time. Make sure it is clean, and
has not picked up any dirt in handling. Lubricate the
I.D. of each ring lightly. Start one end and then the
other, butted closely. Work around circumference
from either or both directions. Joints of successive
rings should be staggered and kept at least 90°
apart. Each individual ring should be frmly seated
with a tamping tool. When enough rings have been
individually seated so that the nose of the gland fol-
lower will reach them, individual tamping should be
supplemented by the gland.
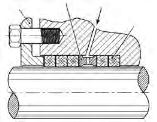
5. If a lantern ring is provided, make sure the lantern
ring is installed under the pipe tap hole.
6. After the last ring is installed, bring the follower
down on the packing and fnger-tighten the gland
nuts. Do not jam the packing by excessive gland
loading. Start pump, and tighten the bolts until leak-
age is decreased to a tolerable minimum. Make sure
gland bolts are tightened evenly. Stopping leakage
entirely at this point will cause the packing to burn
up.
7. Allow packing to leak freely upon startup after re-
pack. Gradually reducing leakage during the frst
hour of operation will result in a better seal over a
Step 1
Step 2
Ruler
Step 3
Steps 5 and 6
I.D.
O.D.
Butt Cut
Joints
Do Not
Stretch
Packing
Mandrel
Gland
Follower
Lantern
Ring
Flush
Port
Braided
Packing
longer period of time. Tighten the gland nuts one fat
at a time until the desired leakage is obtained, and
the pump is running cool.
Powered by FlippingBook Publisher