Page 153 - publication
SEO Version


gruvlok installation and assembly
Introduction
Couplings
Outlets
Fittings
Val
ves &
Accesso
ries
High
Pressure
Advanced Copper
Method (IPS)
DI-LOK
®
Nipples
Plain-End
Fittings
HDPE
Couplings
Sock-It
®
Fittings
Stainless
Steel Method
Roll
Groovers
Installation
& Assembly
Special
Coatings
Design
Services
Technical
Data
Master Format
3 Part Specs.
Pictorial
Index
CTS Copper
System
www.anvilintl.com
153
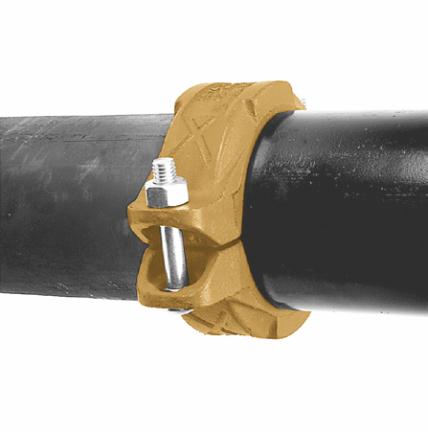
FIG. 7401
Rigidlok
®
Coupling
1
Check & lubricate gasket—
Check gasket to be sure it is compatible for
the intended service. Apply a thin coating of
Gruvlok lubricant to outside and sealing lips of
the gasket. Some applications require lubrica-
tion of the entire gasket surface. Be careful that
foreign particles do not adhere to lubricated
surfaces.
2
Gasket Installation—
Slip the
gasket over the pipe end making sure the
gasket lip does not overhang the pipe end.
On couplings 10" and larger it may be easier to
turn the gasket inside out then
lubricate and slide the
gasket over the pipe end as
shown.
3
Alignment—
After aligning the the
pipe ends, pull the gasket into position
centering it between the grooves on each pipe.
Gasket should not extend into the groove on
either pipe.
On couplings 10" and
larger, fip or roll the gasket
into centered position.
4
Housings—
Remove one nut and bolt
and loosen the other nut. Place one housing
over the gasket, making sure the housing keys ft
into the tube grooves. Swing the other housing
over the gasket and into the grooves on both
tubes, making sure the tongue and recess of each
housing is properly mated. Reinsert the bolt and
run-up both nuts fnger tight.
5
Tighten Nuts—
Securely tighten
nuts alternately and equally to the specifed
bolt torque, keeping the gaps at the bolt pads
evenly spaced.
CAUTION:
Uneven tightening may cause the
gasket to pinch. Gasket should not be visible
between segments after bolts are tightened.
6
Assembly is complete—
Visually inspect the pipe joint to assure
the coupling keys are fully engaged in the pipe
grooves. The bolt pads are to have equal gaps
on each side of the coupling.
CAUTION:
Use of an impact wrench is not recommended because the torque output can
vary signifcantly due to many variables including air pressure supply, battery strength and
operational variations.
CAUTION:
Proper torquing of coupling bolts is required to obtain specifed performance.
Over torquing the bolts may result in damage to the bolt and/or casting which could
result in pipe joint separation. Under torquing the bolts may result in lower pressure
retention capabilities, lower bend load capabilities, joint leakage and pipe joint separation.
Pipe joint separation may result in signifcant property damage and serious injury.
NOTE:
Sizes 16" and larger are cast in multiple segments. To install the larger sizes align the tongue and pocket of the couplings appropriately and tighten the nuts alternately to the specifed bolt
torque. When properly assembled there will be a small equal gap between the adjacent bolt pads.
NOTE:
VdS - Roll Grooving Approval Specifcations, see the Technical Data/Installation Instructions section on Anvil’s web site - www.anvilintl.com
GL-2.10
Powered by FlippingBook Publisher