Page 157 - publication
SEO Version


gruvlok installation and assembly
Introduction
Couplings
Outlets
Fittings
Val
ves &
Accesso
ries
High
Pressure
Advanced Copper
Method (IPS)
DI-LOK
®
Nipples
Plain-End
Fittings
HDPE
Couplings
Sock-It
®
Fittings
Stainless
Steel Method
Roll
Groovers
Installation
& Assembly
Special
Coatings
Design
Services
Technical
Data
Master Format
3 Part Specs.
Pictorial
Index
CTS Copper
System
www.anvilintl.com
157
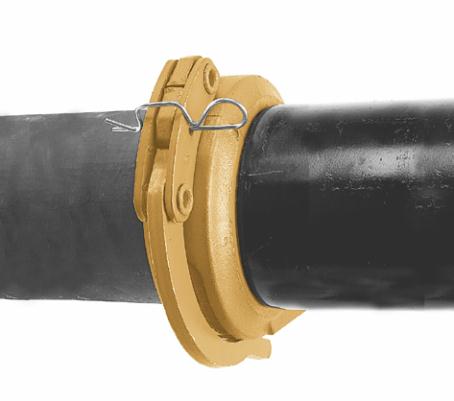
FIG. 7003
Hingelok™ Coupling
1
Check & lubricate gasket—
Check gasket to be sure it is compatible for
the intended service. Apply a thin coating of
Gruvlok lubricant to outside and sealing lips of
the gasket. Be careful that foreign particles do
not adhere to lubricated surfaces.
2
Gasket Installation—
Slip the
gasket over the pipe end making sure the
gasket lip does not overhang the pipe end.
3
Alignment—
After aligning the two
pipe ends, pull the gasket into position
centering it between the grooves on each pipe.
Gasket should not extend into the groove on
either pipe.
4
Housings—
Put one half of the open
coupling over the gasket as the coupling
keys ft frmly into the grooves on each pipe
end. Swing the other half of the coupling into
position around the gasket and into the grooves.
5
Lock coupling—
Fit the nose of the
locking handle in the notch of the opposite
housing. Press frmly down on the handle until it
makes contact with the coupling housing. Insert
locking pin into handle linkage to secure handle
in closed position. (See Caution.)
6
Assembly is complete—
Visually
inspect the pipe joint to assure the coupling
keys are fully engaged in the pipe grooves and
the bolt pads are in frm even metal-to-metal
contact on both sides of the coupling.
CAUTION:
1) Hammering or banging on the handle or coupling housing could cause serious damage
to the locking device and coupling assembly. The result may be an unsuitable pipe joint
and unusable coupling assembly.
2) Care needs to be taken so that fngers do not get caught or pinched when handle is
placed in locked position as a result of cam action of handle assembly.
3) When re-using coupling and gasket, always inspect gasket for damage and hinge/
handle assembly for loosenenss, distortion or any other damage.
NOTE:
Remove locking pin from handle before opening coupling.
GL-2.10
Powered by FlippingBook Publisher